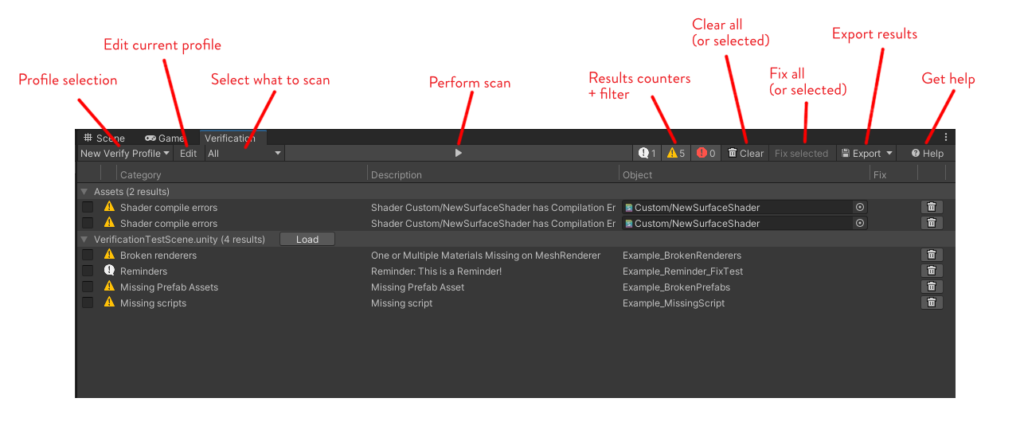
The verification system is a powerful tool to find and fix issues within your projects that otherwise might be hard to find. The system is controlled in a main window, the verification window.
⭐ Opening the verification window
You can open the verification window via Window → Sparrow → Verification Window.
Using the verification window

To perform a scan hit the big button on top of the window. You can customize what to scan in two ways:
- How to scan (Profiles): this determines what kinds of scans are performed, with which individual settings, and individual severities. It would make sense to have different profiles for diciplines: artists could be interested in different checks than audio designers or programmers. See below for more info on profiles.
- What to scan: you can scan your current selection, the current open scene, all assets, or the complete project. Depending on the number of objects to scan, the scan might be very fast or take a few seconds. If you scanned multiple scenes, the results list might offer you the option to load into another scene where errors were found.
⭐ Removing elements from the list
You can remove elements from the list by fixing the issue they point to or by clicking on the remove button. Tip: if you press Shift while pressing the remove button, the element will be ignored in the future. This can be reverted in the settings of the currently selected verify profile.
What is checked?
We have a series of pre-bundled checks in the system, for which you can find detailed descriptions in the Checks section of this manual. You can also use Attributes in your code to quickly check if variables are set correctly when your Components are used in the project, or implement the IVerify interface in your classes to perform your own tests and checks in your project.
Our verification system is designed to be powerful out of the box, but it really shines when the tests are adjusted and customized to fit your individual project needs. We have made it as easy as possible to add your own tests and checks, and you can see how that works on the Creating your own tests article.
The VerifyThis component

You can add the VerifyThis component to any GameObject in your project. It will check the GameObject continuously (once per second) for errors and displays them instantly. That way, you don’t need to go through the Verification Window each time you make changes to an object.
Pro tip: call VerifyThisEditor.DrawVerifyEditor() in your custom editors to add this to your custom scripts. That way, you won’t need to add the VerifyThis component to the objects in question any more!
On automatic fixes
For some tests and checks, an automatic fix has been implemented. For some checks this can be very simple: import settings that do not equal the pre-defined constraints can be adjusted automatically without much doubt. For other checks, fixing the issue automatically is more difficult.
While we do allow for fixing multiple or all issues at once, we recommend going through the list of test results one by one and fixing the issues individually.
Getting more help and support
If you have questions regarding the system, are running into issues or errors, or need other assistance when using the system, feel free to contact us on our discord server in the asset-support channel: 🗯️ Discord


