Starting with update 1.3, we have overhauled the functionality for import settings in a major way. You can use the Project Verification package to automatically place assets into the right folders in your Unity project and automatically assign their import settings, allowing for rapid performance improvements in your projects using just a few clicks.
To use the system, you can set up Asset Folder Rules that determine what sorts of assets should go into a single folder in your project. You can group these rules into an Import Setting Ruleset which allows you to enforce these rules throughout your project. All this is coupled with the possibility to set fine-grained import settings on a per-folder basis.
To give you a head start, we’re including an extensive collection of defaults with our package (one optimized for mobile called ruleset-mobile and one optimized for PC and console called ruleset-pcconsole). We’re giving you the best import settings for your audio, 2D and 3D assets – automatically!
Asset Folder Rules

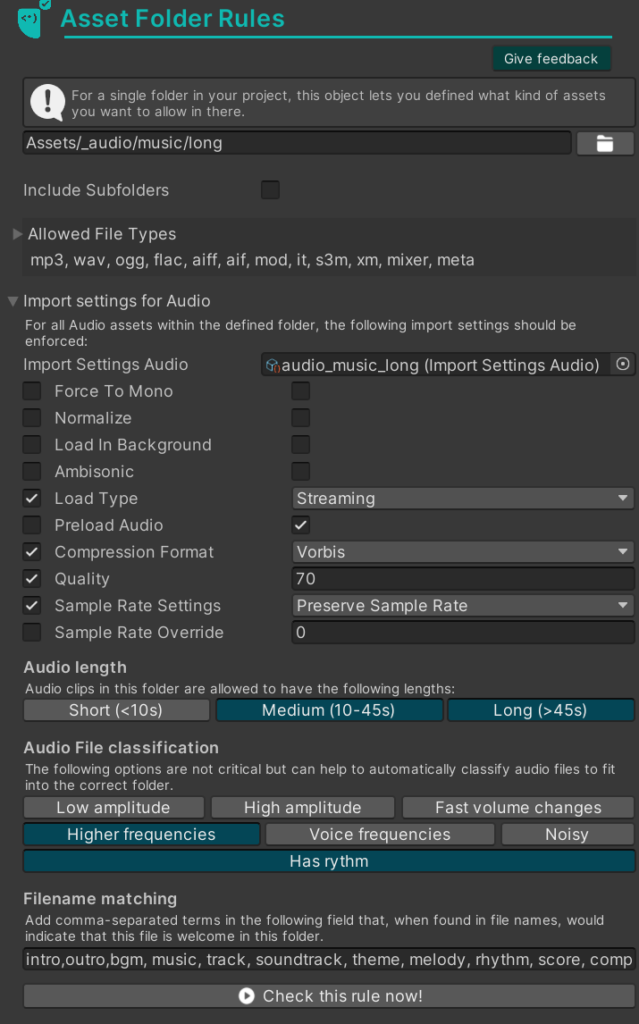
In Asset Folder Rules, you can define what goes into a single folder. For example, in the picture to the right, we’ve defined that long music files should go into the folder Assets/_audio/music/long and that their import settings should be as shown, optimizing game performance by utilizing streaming for these large audio files instead of keeping them in memory. We also determine what file types are allowed for this (in this case, all common audio types).
In the lower section of the editor, we can tell the system various indicators that a given audio file should belong to the category of long music files – for example a length above 10 seconds, higher frequencies and a detectable rythm. We also note a few keywords that might be contained in the file name, giving the system further clues. These settings are hints for our system and will not result in errors if a file in that folder violates these constraints.
All of this is done so that given a set of these rules, the system can automatically determine where a file should be in your project – and automatically move it there! The more detailed these settings, the better the system will be at moving things in place automatically.
All of this is quite detailed, so you can fine tune it to your liking. You can also use our default settings to quickly clean up your project, move everything to its respective folders, and set all the import settings at once!
Import Setting Ruleset

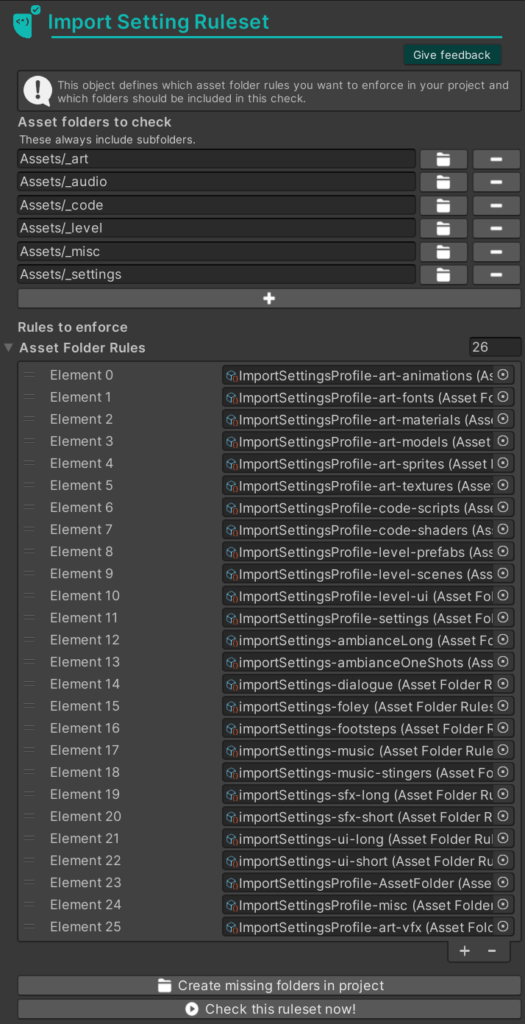
These are collections of folder rules that together define a preset that should be valid in your project. Collect all the folder rules that you want to check in one of these rulesets. You can then assign a ruleset to your verification profile, making sure that it’s checked when using the verification window.
This allows for the creation of different rulesets for different team members. An audio engineer might only be interested in audio files and their import settings, while an artist might look at animations, Sprites, or FBX files.
The system will create folders automatically. At the top, you can assign a number of folders that these rules should apply to. If a file is in one of those folders, it will be flagged as “should be moved” unless one of the folder-specific rules allow it to stay.
So for example, if you have a bunch of rules for all the subfolders of your folder _music how these should be sorted and imported, and you have a lot of unsorted audio files in the folder audioinbox, you can add audioinbox to the list of folders on top and they will be sorted into the _music folders.
Using the system

All of the above can be ignored if you want to use our default settings, which have been hand crafted to be as effective as possible. To use the system, assign a ruleset in your Profile settings unter “Import settings and asset placement”.
Then, you can use our verification window as usual to find assets that should be somewhere else and to fix import settings automatically.


